 < cPanel-form-bar-options.JPG
< home > last updated 7-2-2021
cpanel html FORM
< cPanel-form-bar-options.JPG
Form [DETAILS FOLLOW]
Checkbox Properties: Name Value Selected Required
Radio Button Properties: Name Value Selected Required
Text Field: Text Field Properties ... many (get image)
Textarea: Textarea Properties ... (many (get image)
Selection Field: Selection Field Properties ... many (get image)
Button Properties: Name Text(Value) Type
Hidden Field Properties: Name Value
( SEE BELOW POSTED ONLINE:
But after I entered a new hidden field in my form: Name: mail_options Value: FromAddr=myemail@mysite.com, messages now come through correctly.
h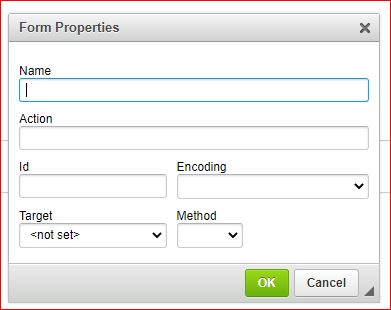 < Form-Properties-Declaration.JPG
  < declared
PRODUCES THE FOLLOWING HTML:
<html>
<head>
<title></title>
</head>
<body>
<form action="BBBBBBB" enctype="text/plain" id="CCCCCCC" method="post" name="AAAAAA" target="_blank"></form>
<p></p>
</body>
</html>
( gOdADDY cPanel User interface: )
html Form Properties
"html" "Form" "Name" ... https://www.w3schools.com/tags/att_form_name.asp
"html" "Form" "Action" ... https://www.w3schools.com/tags/att_form_action.asp
"html" "Form" "Id" ... https://www.w3schools.com/html/html_id.asp
"html" "Form" "Encoding" ... https://www.w3schools.com/tags/att_form_enctype.asp
text/plain
multipart/form-data
application/x-www-form-urlencoded
"html" "Form" "Target" ... https://www.w3schools.com/tags/att_form_target.asp
<not set>
New
Top
Same
Parent
"html" "Form" "Method" ... https://www.w3schools.com/tags/att_form_method.asp
GET
POST
https://www.w3schools.com/html/html_forms.asp :
An HTML form is used to collect user input. The user input is most often sent to a server for processing.
Try it Yourself »
The HTML <form> element is used to create an HTML form for user input:
<form>
.
form elements
.
</form>
The <form> element is a container for different types of input elements, such as: text fields, checkboxes, radio buttons, submit buttons, etc.
All the different form elements are covered in this chapter: HTML Form Elements. ( www.w3schools.com/html/html_form_elements.asp )
The HTML <input> element is the most used form element.
An <input> element can be displayed in many ways, depending on the type attribute.
Here are some examples:
| Type | Description |
|---|---|
| <input type="text"> | Displays a single-line text input field |
| <input type="radio"> | Displays a radio button (for selecting one of many choices) |
| <input type="checkbox"> | Displays a checkbox (for selecting zero or more of many choices) |
| <input type="submit"> | Displays a submit button (for submitting the form) |
| <input type="button"> | Displays a clickable button |
All the different input types are covered in this chapter: HTML Input Types.
The <input type="text"> defines a single-line input field for text input.
A form with input fields for text:
<form>
<label for="fname">First name:</label><br>
<input type="text" id="fname" name="fname"><br>
<label for="lname">Last name:</label><br>
<input type="text" id="lname" name="lname">
</form>
Try it Yourself »
This is how the HTML code above will be displayed in a browser:
Note: The form itself is not visible. Also note that the default width of an input field is 20 characters.
Notice the use of the <label> element in the example above.
The <label> tag defines a label for many form elements.
The <label> element is useful for screen-reader users, because the screen-reader will read out loud the label when the user focus on the input element.
The <label> element also help users who have difficulty clicking on very small regions (such as radio buttons or checkboxes) - because when the user clicks the text within the <label> element, it toggles the radio button/checkbox.
The for attribute of the <label> tag should be equal to the id attribute of the <input> element to bind them together.
The <input type="radio"> defines a radio button.
Radio buttons let a user select ONE of a limited number of choices.
A form with radio buttons:
<p>Choose your favorite Web language:</p>
<form>
<input type="radio" id="html" name="fav_language" value="HTML">
<label for="html">HTML</label><br>
<input type="radio" id="css" name="fav_language" value="CSS">
<label for="css">CSS</label><br>
<input type="radio" id="javascript" name="fav_language" value="JavaScript">
<label for="javascript">JavaScript</label>
</form>
Try it Yourself »
This is how the HTML code above will be displayed in a browser:
Choose your favorite Web language:
The <input type="checkbox"> defines a checkbox.
Checkboxes let a user select ZERO or MORE options of a limited number of choices.
A form with checkboxes:
<form>
<input type="checkbox" id="vehicle1" name="vehicle1" value="Bike">
<label for="vehicle1"> I have a bike</label><br>
<input type="checkbox" id="vehicle2" name="vehicle2" value="Car">
<label for="vehicle2"> I have a car</label><br>
<input type="checkbox" id="vehicle3" name="vehicle3" value="Boat">
<label for="vehicle3"> I have a boat</label>
</form>
Try it Yourself »
This is how the HTML code above will be displayed in a browser:
The <input type="submit"> defines a button for submitting the form data to a form-handler.
The form-handler is typically a file on the server with a script for processing input data.
The form-handler is specified in the form's action attribute.
A form with a submit button:
<form action="/action_page.php">
<label for="fname">First name:</label><br>
<input type="text" id="fname" name="fname" value="John"><br>
<label for="lname">Last name:</label><br>
<input type="text" id="lname" name="lname" value="Doe"><br><br>
<input type="submit" value="Submit">
</form>
Notice that each input field must have a name attribute to be submitted.
https://www.w3schools.com/html/html_forms_attributes.asp : HTML Form Attributes
This chapter describes the different attributes for the HTML <form> element.
The Action Attribute: The action attribute defines the action to be performed when the form is submitted.
Usually, the form data is sent to a file on the server when the user clicks on the submit button.
In the example below, the form data is sent to a file called "action_page.php". This file contains a server-side script that handles the form data:
GOOGLE> GODADDY SERVER-SIDE SCRIPT FORM DATA:
Getting Started 12-09-2018
It appears GoDaddy's server, seemingly as a protection against spam, refused to use the unknown incoming email addresses of visitors' using the form to re-direct those messages to my inbox. But after I entered a new hidden field in my form: Name: mail_options Value: FromAddr=myemail@mysite.com, messages now come through correctly.
Of course, I have to allow that changes I made earlier to my hosting configuration which alone didn't improve matters may nonetheless have made a positive contribution once 'FromAddr=' was added to my form hidden fields. On the other hand, the use of 'FromAddr=' might have done the trick on its own and anyone else experiencing a similar issue would be wise to try it anyway - always, of course, replacing 'myemail@mysite.com with their own (preferably GoDaddy) email address.
In any event, panic over and loud cheers all around! Thank you for your kind involvement, @rd.
Example
On submit, send form data to "action_page.php":
<form action="/action_page.php">
<label for="fname">First name:</label><br>
<input type="text" id="fname" name="fname" value="John"><br>
<label for="lname">Last name:</label><br>
<input type="text" id="lname" name="lname" value="Doe"><br><br>
<input type="submit" value="Submit">
</form>
Tip: If the action attribute is omitted, the action is set to the current page.
The Target Attribute
The target attribute specifies where to display the response that is received after submitting the form.
The target attribute can have one of the following values:
Value Description
_blank The response is displayed in a new window or tab
_self The response is displayed in the current window
_parent The response is displayed in the parent frame
_top The response is displayed in the full body of the window
framename The response is displayed in a named iframe
The default value is _self which means that the response will open in the current window.
Example
Here, the submitted result will open in a new browser tab:
<form action="/action_page.php" target="_blank">
The Method Attribute
The method attribute specifies the HTTP method to be used when submitting the form data.
The form-data can be sent as URL variables (with method="get") or as HTTP post transaction (with method="post").
The default HTTP method when submitting form data is GET.
Example
This example uses the GET method when submitting the form data:
<form action="/action_page.php" method="get">
Example
This example uses the POST method when submitting the form data:
<form action="/action_page.php" method="post">
Notes on GET:
Appends the form data to the URL, in name/value pairs
NEVER use GET to send sensitive data! (the submitted form data is visible in the URL!)
The length of a URL is limited (2048 characters)
Useful for form submissions where a user wants to bookmark the result
GET is good for non-secure data, like query strings in Google
Notes on POST:
Appends the form data inside the body of the HTTP request (the submitted form data is not shown in the URL)
POST has no size limitations, and can be used to send large amounts of data.
Form submissions with POST cannot be bookmarked
Tip: Always use POST if the form data contains sensitive or personal information!
The Autocomplete Attribute
The autocomplete attribute specifies whether a form should have autocomplete on or off.
When autocomplete is on, the browser automatically complete values based on values that the user has entered before.
Example
A form with autocomplete on:
<form action="/action_page.php" autocomplete="on">
The Novalidate Attribute
The novalidate attribute is a boolean attribute.
When present, it specifies that the form-data (input) should not be validated when submitted.
Example
A form with a novalidate attribute:
<form action="/action_page.php" novalidate>
HTML Exercises